May 15, 2017
This blog post was originally posted on AndroidThings.rocks
Panic Button is an Android application targeting Android Things that integrates with Twilio to deliver SMS’s or phone calls to a configured phone number when a physical button is pressed.
Wow, that’s a lot of buzzwords. Let’s break it down and build one.

The Idea
I have been an Android Developer for the last few years and I recently got a Raspberry Pi 3 as a gift. I was interested in getting one since Android Things was announced but for some reason never did. Now the excuses are over, and it’s time to play with it.
I have also been very interested in services that link the physical world to the internet, and vice versa.
Considering that Android Things connects hardware to the internet, why not come back to the disconnected world and receive a plain old SMS or a Phone call to close the circle?
The Hardware
This was the part of the project that I was most intimidated about.
I do not have any sort of electronic or electrical experience whatsoever, but I have to say that this circuit is really simple to put together.
Here’s the list of hardware components you will need for this project:
- One RaspberryPI3
- One Breadboard for easy prototyping
- One button
- One resistor
- Four jumper wires
Here is the diagram with the layout of the components:
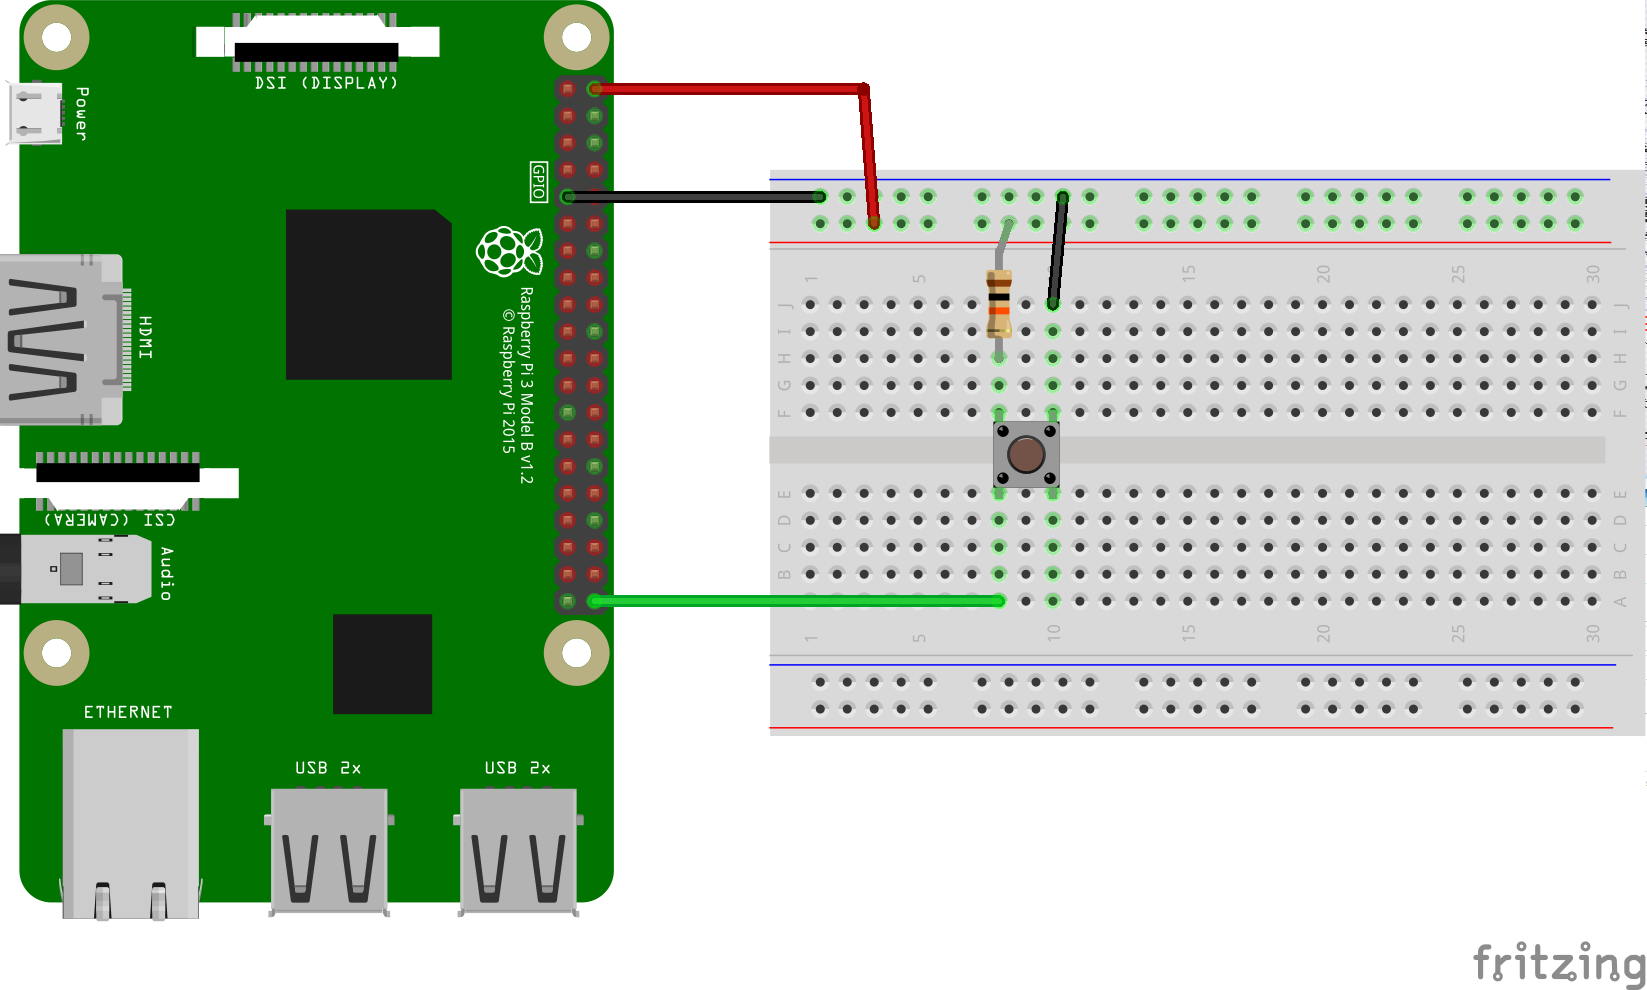
If you tried the SimplePIO sample button project in the past, you might have realised that it is exactly the same circuit.
Twilio account setup
You will need to create a Twilio account to configure the application with the correct credentials.
The free trial account provides enough resources to experiment and play around with this project.
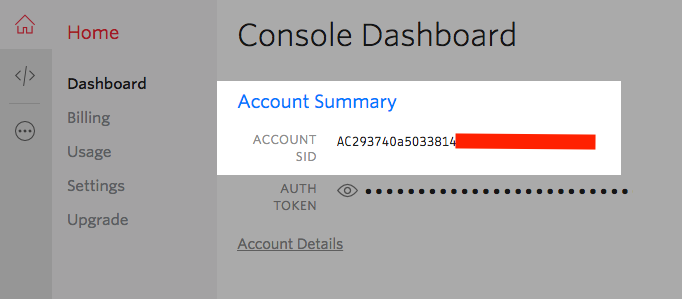
Once signed up, head over to the console to get the first piece of information we need: the ACCOUNT_SID
API Key
You will also need to generate an API Key to access the REST API.
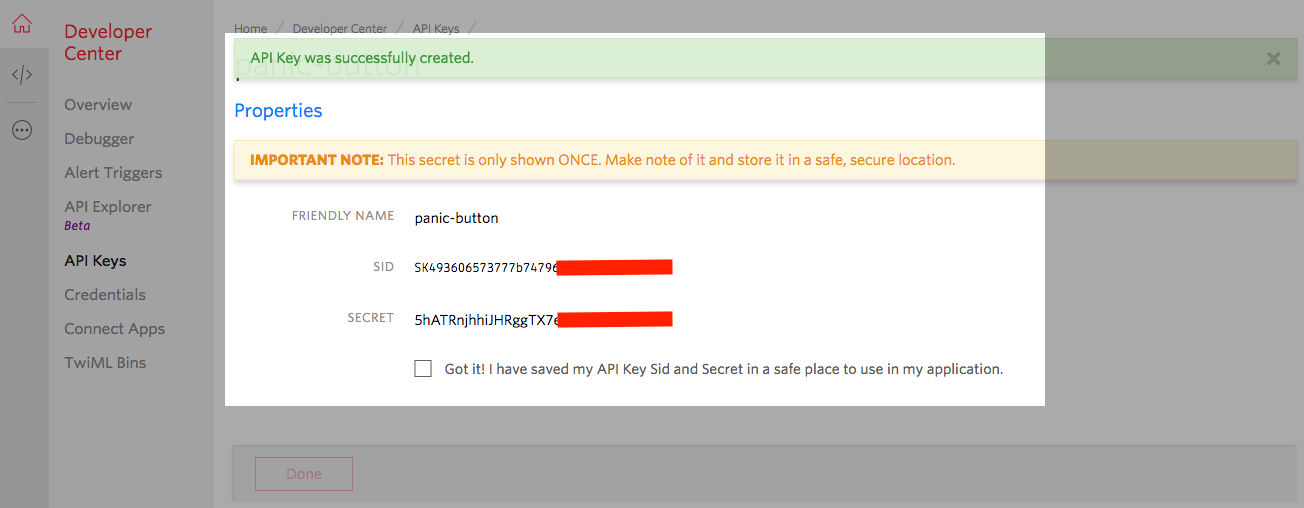
Browse to Developer Center / API Keys and create a new key by pressing the + red button.
Enter a friendly name, and click Create API Key. After this you will see a very important screen where the API_KEY and API_SECRET will be displayed. Make sure your write this two strings somewhere (specially the secret), as you will not be able to see it again after leaving that screen.
Phone Numbers
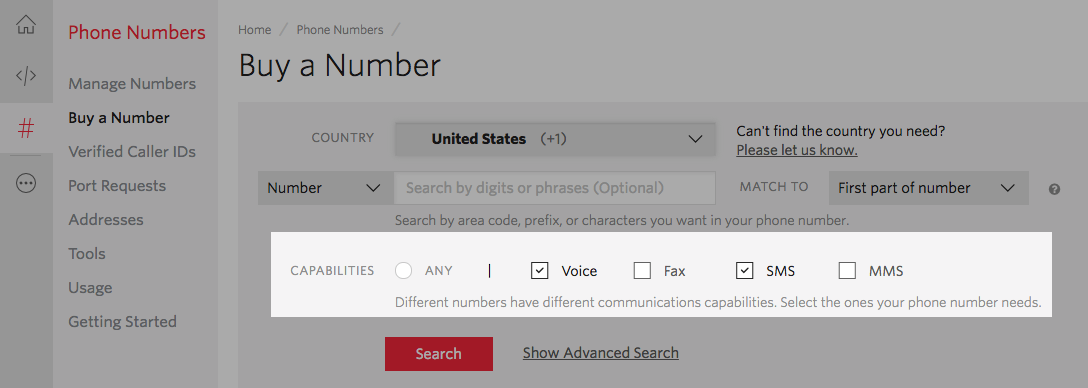
Next step is to choose a Twilio phone number. This will be the origin number calling or sending the SMS.
Browse to All Products & Services / Phone Numbers / Manage Numbers and create a new phone number by pressing the + red button.
Make sure to select SMS and Voice in the capabilities section when selecting the phone number.
Finally, due to a restriction on Twilio’s trial account, we need to verify the phone number that will receive the phone call and/or SMS.
Browse to All Products & Services / Phone Numbers / Verified Caller IDs and validate your phone number by receiving a phone call or an SMS with the usual verification code.

Twilio API
In order to authenticate our application against the API, we need to use the API_KEY and the API_SECRET to create a Basic Http Authentication header.
In other words, we need to send a header with the name Authorization with the value of Basic base64( API_KEY : API_SECRET )
If we want to receive a phone call from Twilio to our verified phone number, we need to perform a request to the /Calls API endpoint:
POST https://api.twilio.com/2010-04-01/Accounts/{ACCOUNT_SID}/Calls
Authorization: Basic {API_KEY}:{API_SECRET}

From=TWILIO_PHONE_NUMBER&
To=VERIFIED_PHONE_NUMBER&
Url=TWIML_URL
Alternately, if we want to receive an SMS, we will have to send the following API request to /Messages:
POST https://api.twilio.com/2010-04-01/Accounts/{ACCOUNT_SID}/Messages
Authorization: Basic {API_KEY}:{API_SECRET}

From={TWILIO_PHONE_NUMBER}&
To={VERIFIED_PHONE_NUMBER}&
Body={TEXT_MESSAGE}
Note: the url’s and parameters are case sensitive!
Show me the code!
First of all, we need to add your Twilio configuration to the project.
Open the gradle.properties file at the root of the project and enter your configuration:
PANIC_BUTTON_PHONE_NUMBER_FROM="{ORIGIN PHONE NUMBER}"
PANIC_BUTTON_PHONE_NUMBER_TO="{TARGET PHONE NUMBER}"
PANIC_BUTTON_TWILIO_ACCOUNT="{TWILIO ACCOUNT SID}"
PANIC_BUTTON_TWILIO_API_KEY="{TWILIO API KEY}"
PANIC_BUTTON_TWILIO_API_SECRET="{YOUR TWILIO API SECRET}"
Gradle will pickup this properties at build time, and with a little bit of configuration on the build.gradle, add them to the BuildConfig class so the application code can access them as final static variables.
With all the config out of the way, let’s take a high level look at the main classes in the project.
TwilioClient is a very simple http wrapper built on top of OkHttp.
This class is responsible for implementing the Twilio API’s details mentioned in the previous section.
Also, it exposes two public methods that invokes the correspondent API: sms() and call().
public void sms() {
  Log.d(TAG, "Sending SMS request...");

  RequestBody formBody = new FormBody.Builder()
      .add("From", BuildConfig.PHONE_NUMBER_FROM)
      .add("To", BuildConfig.PHONE_NUMBER_TO)
      .add("Body", "SMS text body")
      .build();

  Request.Builder builder = new Request.Builder()
      .url(BASE_URL + "/Messages")
      .post(formBody);

  execute(builder);
}
```

In order to decide if we should send an SMS or request a phone call, we first need to detect what kind of event was generated by the hardware button.

The wanted the application to trigger an SMS request if the event is a `simple press` and to perform a phone call request if the event happens to be a `long press`.

[`GpioEventCallback`][code4] takes cares of handling the events from the `Gpio` and deciding the type of the event, based on the duration of the button being pressed.

You can think of this class as a listener for the `click down` and `click up` events, that also counts the amount of time between them and compares it to `LONG_PRESS_DELAY_MS` to decide wether the event was a `single press` or a `long press`.

Once it knows what kind of event was generated, it takes care of invoking the correct method on `TwilioClient`.

```java
private static final long LONG_PRESS_DELAY_MS = 600;

private TwilioClient twilio;
private long pressStartedAt;

@Override public boolean onGpioEdge(Gpio gpio) {
  boolean gpioValue;
  try {
    gpioValue = gpio.getValue();
  } catch (IOException e) {
    Log.e(TAG, "Error reading PIO value.", e);
    return true;
  }

  // gpioValue == false, button pressed
  // gpioValue == true, button released

  if (!gpioValue) {
    pressStartedAt = System.currentTimeMillis();
  } else {
    long duration = System.currentTimeMillis() - pressStartedAt;
    if ( duration < LONG_PRESS_DELAY_MS) {
      twilio.sms();
    } else {
      twilio.call();
    }
  }
}
Lastly, we need to create an Activity to connect all this pieces together, and for the system to be able to launch our application.
@Override protected void onCreate(Bundle savedInstanceState) {
  super.onCreate(savedInstanceState);

  OkHttpClient httpClient = new OkHttpClient();
  TwilioClient twilio = new TwilioClient(httpClient);
  GpioEventCallback callback = new GpioEventCallback(twilio);

  try {
    String pinName = BoardDefaults.getGPIOForButton();
    mButtonGpio = new PeripheralManagerService().openGpio(pinName);
    mButtonGpio.setDirection(Gpio.DIRECTION_IN);
    mButtonGpio.setEdgeTriggerType(Gpio.EDGE_BOTH);
    mButtonGpio.registerGpioCallback(callback);
  } catch (IOException e) {
    Log.e(TAG, "Error on PeripheralIO API", e);
  }
}
Now let’s connect to our Raspberry Pi 3, build the application and install it on the device
$ adb connect {YOUR DEVICE IP}
* daemon not running. starting it now on port 5037 *
* daemon started successfully *
connected to {YOUR DEVICE IP}:5555

$ ./gradlew installDebug

$ adb shell am start com.robertoestivill.panicbutton/.PanicButtonActivity
And this is the project in action
Next steps
It was super fun to work on a project that involves physical things and can not wait to play more. I hope you find this project as interesting and educational as I did.
There are a lot of improvements and fixes that can be incorporated to make a more robust and sophisticated application. This was just a proof of concept.
Checkout the full source code and more details about the project on the Github repository.
If you have any comments or feedback feel free to contact me @robertoestivill